April 23, 2008

Install Tutorial Wordpress

When I first installed Wordpress, I had a lot of trouble finding information that pertained to the exact problems I was running into. Once I got Wordpress up and running, I realized that it just wasn’t that hard to set up. Since then, I’ve seen numerous people on the Wordpress forums seeking help with the same problems day in and day out.
My web host is 1&1 and I’ve been pleased with the sevice I have. If you don’t yet have a host, 1&1 has packages as low as $2.99/month that has all you need to run a website (even your own Wordpress site) including your domain name. Having said that, 1&1 has their own blog that you can set up through the control panel. This blog is actually a Wordpress blog, but is extremely limited in features and options. I’d recommend going ahead and setting up a database and installing the real thing…………..and I’m going to show you how to do it.
For this tutorial, I’m going to assume that your host is 1&1. You will need the Linux hosted package to have access to MySQL. The first thing we need to do is set up a MySQL database. Log in to the 1&1 Control Panel under the Administration tab, click on MySQL Administration.


There you will click “New Database”:


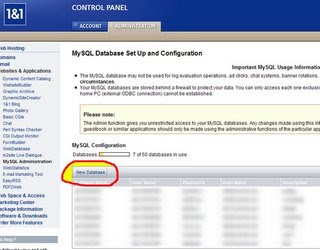
You’ll be prompted for a description for your database. just enter something like “blog” or “wordpress” and click “Set Up”. That was easy enough, huh? From there, 1&1 will set up a database for you. Normally, this will take just a couple of minutes. Click on “overview”, and the screen will show you the status of your database, either “setting up” or “ready”. Once it’s in “ready” status, you are ready for the next step.
Next up is to download Wordpress from wordpress.org if you haven’t already. You’ll have to have a utility to unzip the file. I used WinRAR. The only file you’ll need to do anything to before you upload everything is “wp-config-sample”. Right click on the wp-config-sample file and open with Notepad or Wordpad. Here you will fill in your database details from the 1&1 control panel in place of what’s there.


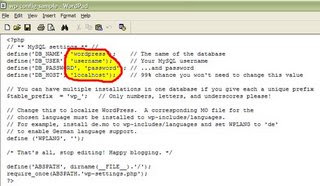
With 1&1, you WILL need to change the host name from “local host” to the actual host address…………no problem!
Once you enter the details of your database, go to the top left corner of Notepad and click “File”, then “Save As” and rename the file “wp-config.php”.
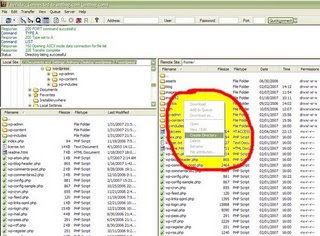
Hang in there, because we’re almost done. You’ve already done the hardest and most confusing part. All that’s left is uploading these files to the server. Wordpress will automatically set up the needed tables on your database. For uploading files, I use Filezilla, which is a free program you can download from filezilla.sourceforge.net. Here you will upload all the Wordpress files to whatever directory you want your blog to be in

If you want Wordpress to be your main site, you would upload the files in to the root directory (index/home/default/etc.). If you would like your blog to be part of an existing site, you would create a directory in the root and upload the files to that directory. AT the time I first wrote this tutorial, I already had a website and wanted my blog address to be www.antbag.com/blog. So I created a directory called “blog” inside the root and uploaded the files there. To create a directory with Filezilla, all you have to do is right click inside the root, and choose “create directory”. It’s really pretty simple.


Once you’ve uploaded the files, you’re ready to go to your website and set this thing up! Now open your browser (Firefox, Internet Explorer, etc.), and in the URL address field at the top, type in your site and add “/wp-admin/install.php” to the address (example: www.yoursite.com/wp-admin/install.php or www.yoursite.com/blog/wp-admin/install.php depending on the directory you uploaded the files to). From here, Wordpress will lead you through the rest. Be sure to take special note of the password that Wordpress gives you. You WILL need this to log in. You can easily change it once you’re logged in, but you’ll need it for your first log-in.
I hope this has been helpful to you getting Wordpress set up. Personally, I couldn’t find much information on the subject. There were plenty of tutorials, but not that explained setting up the database and how to get done what needed to be done in the 1&1 Control Panel. Good Luck.

Install Tutorial for Apache PHP PEAR MySQL phpMyAdmin on Windows XP

I’ve had lots of people ask my in the past, how to install PHP, MySQL and Apache for Windows XP. I recently formated my computer, and since I was going to do it, I thought I’d write out how to do this, for anyone who wants to know. My computer has SP2 installed.
Apache Web Server
Download Apache HTTP Server. I downloaded the current stable release, in this case: Apache 2.0.54. So download the Win32 Binary (MSI Installer), double click it, let it install.
PHP Run-time
Download PHP. I downloaded PHP 4.4.0. PHP 5 is the way to go. The tutorial below is pretty much the same, see the comments if you have problems. Unzip the contents, and put it all in the folder C:\php.Copy the following files into your Apache2 installation directory. In my case it was C:\Program Files\Apache Group\Apache2.
Code:

php4ts.

dllphp4apache2.dll

php.ini-recommended

Rename php.ini-recommened to php.ini. Open the php.ini in your favorite editor. Mine is EditPlus.
Search for ‘doc_root’ until you find the line:
Code:

doc_root =

Change this line to (in my case):
Code:

doc_root = C:Program FilesApache GroupApache2htdocs

Go to the directory: C:\Program Files\Apache Group\Apache2\conf\;Add the following lines to the end of the file httpd.conf:
Code:

LoadModule php4_module php4apache2.dll

AddType application/x-httpd-php .php

In the same file, add index.php to DirectoryIndex — this will make sure index.php will be picked up by the server automatically:

Code:

DirectoryIndex index.html index.html.var index.php

PEAR Extension
PEAR is an extension for PHP. These days PEAR is included with PHP, but you need to install it yourself. I use PEAR on all my PHP developments.
Ok.. Installing PEAR isn’t bad, here is what you do:
Open a command line window (i.e. Start->Run->cmd)Go to the PHP directory, in my case C:\php. Type go-pear.bat. Follow the instructions.The PEAR extension get installed in C:\php\PEAR directory.Once PEAR is installed, go to the php.ini file in your Apache2 directory. Find the
Code:

;include_path = ".;c:phpincludes"

Remove the semi-colon (to un-comment it), and then add C:\php\PEAR to it
Code:

include_path = ".;c:phpincludes;C:phpPEAR"

MySQL DataBase
Download MySQL (runtime) and MySQL Administrator (Admin program). I used MySQL 4.1 Generally Available (GA) release. Download, unzip, and install both.
Testing it all – you really don’t need to, but before testing, restart your computer.
Test Apache Web Server
Once Apache is installed, you should be able to go to your favorite browser, type the following URL: http://localhost/ and have a test page load.
Test PHP
Go to the htdocs folder in Apache2 folderCreate a file called index.php, inside of that file put (be sure to remove the space between the <>
Code:

echo "php installed ok";
?>

Go to your browser, type the following URL: http://localhost/index.phpIf everything worked OK, “php installed ok” will appear on the screen.

Test MySQL and PHP using phpMyAdmin
Download phpMyAdmin.This is the best web based MySQL Administration Tool (vital, trust me).Unzip the contents into a folder phpMyAdmin in your htdocs folder.Were going to use phpMyAdmin to control MySQL instead of the command line.In the phpMyAdmin folder open the config.inc.php and type in the your root password for MySQL:
Code:

$cfg['Servers'][$i]['password'] = 'xxxxx';

Try and run phpMyAdmin in your browser: http://localhost/phpMyAdmin/You’ll most likely get the error:
Client does not support authentication protocol requested by server; consider upgrading MySQL client
To fix this, do the following:

  1. Start the MySql Administrator, select “Startup Variables” from the menu, select the “Security” Tab. Check ‘Use old passwords’.
  2. Select “User Administration” from the menu, select the root user account and change the password for root user (other than null)
  3. Select “Service Control” from the menu, press “Stop Service” button and then press “Restart Service”.

Go back to config.inc.php and type in the your new root password for MySQL:
Code:

$cfg['Servers'][$i]['password'] = 'yyyyyy';

Try and run phpMyAdmin: http://localhost/phpMyAdmin/ — this should work now.

Test PEAR
Using phpMyAdmin to create a databaseIn your htdocs folder create a file called testpear.php, in the file put the following (be sure to remove the space between the <>
Code:

require_once 'DB.php';

PEAR::setErrorHandling(PEAR_ERROR_DIE);

$db_host = 'localhost';

$db_user = 'root';

$db_pass = 'password';

$db_name = 'dataBase_name';

$dsn = "mysql://$db_user:$db_pass@unix+$db_host/$db_name";

$db = DB::connect($dsn);

$db->setFetchMode(DB_FETCHMODE_OBJECT);

?>

This will use the PEAR DB Extension to create a connection to your database. Before running this file make sure your database details are correct (i.e. name, user, password). Run this file in your browser, if no errors are listed, then your good to go.

related post Install xampp

SEO Tools to Maximize site

This is list of tools that could be used to maximize SEO of a site :

HitTail : This tool used to observe the keyword that use to come to your website.By used this tool it was hoped that you could organize the key words that was owned by your website and you will have the picture for the further development.
Quintura : This tool was used to depict nearness relations of the key word that was owned by you.Quintura was the seeker's machine that could put forward results visually apart from in a standard manner like the seeker's other machine.
Buzz : Tool the seeker of the key word.This tool could give the explanation to you anyone who used this key word.
Spider Simulator : This tool could explain how the search machine spider (googlebot) could reach out your website and what that could be done by you to increase the ranking of your site in the search machine.
Google Webmaster Central : Information about how Google searched and indexed a website.
SEO for Blog and RSS feed : Tips and the strategy to maximize blog and your RSS feed.

Tutorial Install Joomla

Here are the steps to install joomla:

Extract the joomla package that you have download to C:\Program Files\xampp\htdocs (for the personal computer that used windows), If you want to install in your hosting server, install joomla in the root directory that usually placed in public html.
In next further steps, will explained the steps to installing joomla in the personal computer, if you install in hosting server adapted joomla with the root’s directory of your hosting.
Rename the folder produced by the extract by the name of that was wanted, for example: workshop
RUN the internet browser, then typed : http://localhost/workshop or by the name of your domain if placed in hosting server.
Pre-installation check: confirmed every service server (PHP, MySQL, support Zip, etc.) has run in your computer, which was marked by the green colour. Click Next
License: click Next
Setting the Database Configuration
Hostname : localhost
MySQL User Name : root
MySQL Password : (blank it)
MySQL Database Name : workshop (up to you, this is for the database name)
MySQL Table Prefix : jos_(As the prefix name of the table in database, this could you substitute)
Drop Existing Tables : If being chosen and if beforehand has been gotten database by the name of that was same in the computer, then the table in database beforehand will be removed.
Backup Old Tables : If being chosen then the table beforehand in database that was same would in back up.Install Sample Data : If being chosen then in installing Joomla will be given by the example of the data.If you not experienced with Joomla, it is better also installing the data data sample, but if you having experience with Joomla it’s no need to be chosen.On site name : fill with web name, example: “Workshop Joomla”. Click NextFill Your Email with your email address and change Admin Password in accordance with that was wanted and found it easy to be remembered.Click NextErase the folder [installation] on your web folder that placed to C:\ProgramFiles\xampp\htdocs\workshop\ Click Administration to see the Administrator website’s page or by run this URL: http://localhost/workshop/administratorTo preview your site that has been installed, click View site or by run this URL: http://localhost/workshop

Install XAMPP Apache MySql PHP

To install Joomla was needed :


PHP 4.2.x or new version. download on http://www.php.net/
MYSQL 3.23.x or new version. download on http://www.mysql.com/
Apache 1.13.19 or new version. download on http://www.apache.org/


If you use the hosting service to install Joomla (online hosting), inside the host server usually has been gotten by PHP, MYSQL and APACHE so as we might no need to install joomla again.

If want to made website in the personal computer first and upload it to hosting when it is being finished, then you must install PHP, MYSQL, and APACHE on your personal computer. You can install the XAMPP program, where inside has been gotten by PHP, MYSQL and Apache.

Install XAMPP


Run the XAMPP package program installer, download the xampp program here

Make sure to install all service that was needed by Joomla (PHP, MYSQL and APACHE).

In the XAMPP control panel make sure that APACHE and MYSQL in the running condition.

To confirm whether local server has running or not then typed: localhost in the browser.

To make website in local server or in the personal computer, the file and website’s folder must be placed in: C:\Program Files Program\xampp\htdocs